Partitions divide the hard disk into separate boxes to organize your data better. And did you know they are even helpful for data recovery in case your hard disk gets corrupted? Most of the time, a hard disk corruption blows out a particular partition. That means if you have more than one partitions and one of them gets corrupted due to a scratch or burn, data in the other partitions remain intact.
Usually when you buy a new computer or laptop, your hard disk would be pre-formatted to have a single C: drive occupying the entire space. But for most people, this is really inconvenient and would want to have 2 or more partitions. With windows XP and earlier, you had to use third party tools like "Partition magic" in order to do any kind of resizing. But in Vista, Windows 7 and Windows 8, the inbuilt "Disk Management" utility can do all these for you more safely.
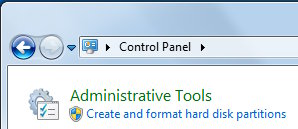
Let's see how to shrink an existing partition so we can create new partitions later on. First, open the "Control Panel", type "Format" in the search bar and click on the "Create and format hard disk partitions" option under "Administrative Tools" that filters out.
This will open the "Disk Management" utility window.

Shrinking a windows partition.
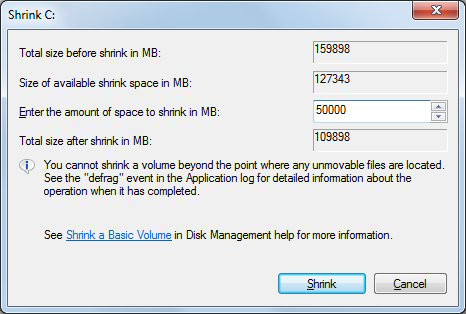
To shrink an existing partition, right click on the partition and click on "Shrink Volume". This will bring up a "Querying for free space" window which might take a few seconds. Once done a new window will appear where you need to specify the amount of space you want to free from the drive. The full amount of free space on the drive will be the default. For instance, here is me trying to shrink a 159GB drive by freeing 50GB.
Creating a new partition.
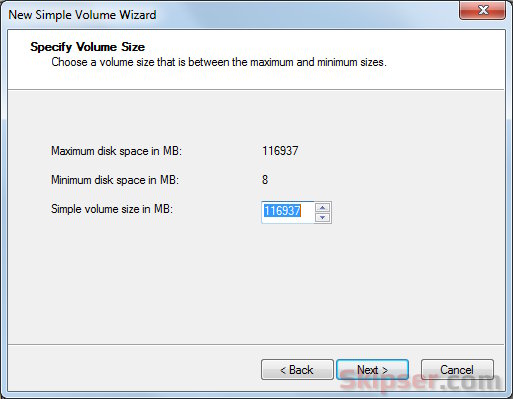
Now that we have created some free space, let's create a new partition. To do so, right click on the free space and select "New Simple Volume". This will start a wizard which will ask you for the amount of space you want to use for the new partition, a drive letter, the file system to use(NTFS, FAT etc) and also gives an option to format the partition once created.
Once you finish the wizard, your new drive will be ready for use.
Deleting a partition.
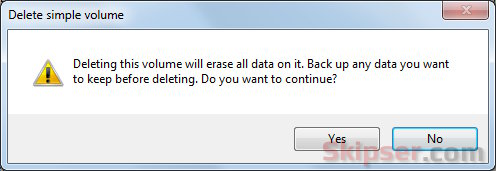
Now that you have created a partition, lets see how you can delete it if needed. Just right click on the partition and select "Delete Volume". This will bring up a warning to copy existing data in the partition before proceeding. Click "Yes" your partition will be deleted to create free space of the same size.
Expanding a partition.
There are two cases where you would want to expand your partition.
- You have some free space near a partition and you want to utilize it by adding that space to an existing partition.
- You want to combine two partitions to one there by adding the space of the second one to the first. This is mostly the case whenever you find your C: drive getting exhausted and want to add some space into it from the next drive say D:
If you want to increase the size of a partition, there should be some free space just next to it. That means if you want to merge two partitions, you should first copy all the data in the second partition some where, delete the partition to free its space and then increase the size of the first partition to occupy the entire free space.
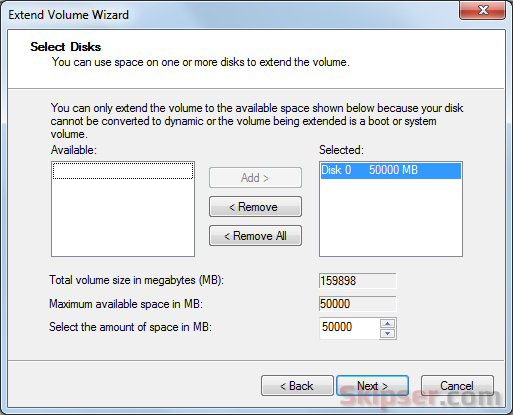
To expand or increase the size of a partition, right click on the partition and select "Extend Volume". A wizard would appear where either you can either add the entire existing free space to the partition or add a part of the free space to it. Click finish and your partition will now be bigger by the amount you just added.
And finally, here's a video to show it all in action -
So if you too are the person with a single C: drive, take the dive now. Creating and extending partitions are too easy with the Disk Management utility. Please try out and let me know any issues you face as comments below so I can help out.