Google+ badges are similar to the Facebook like box. They allow people to connect to your Google+ page from your Blog or website.
But even though it has been a long time since the badges were released, not many websites actually use it. The main reasons are -
- The not-so-attractive looks and the lack of customisation. The badges come with a standard width of 300 pixels and there is no scope to change even the width, colour or your image.
- They are only for Google+ pages and not for individual profiles. For most individual writers, pages have been a disaster and its the main profile that gets followers.
With the existing badge as it is, there is little hope of your viewers using it if added on your site.
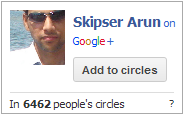
Here's a better solution - a fully customisable Gplus Badge. Here are some previews:
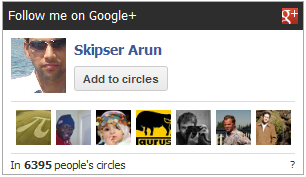 |
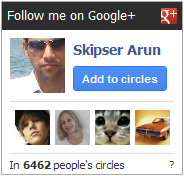 |
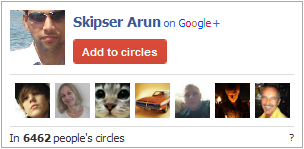 |
 |
 |
 |
Requirements
The only requirement is that your web server should support PHP5.
Important: This doesn't mean you can show the badge only on php pages. You can show the badge on any page including .html files and php is just a back-end requirement.
Installation
For Wordpress.
To install the plugin to your wordpress blog, just follow these steps.
- Download the plugin from wordpress plugin directory and unzip
- Upload the gplus-badge folder to the `/wp-content/plugins/` directory.
- Activate the plugin through the 'Plugins' menu in WordPress.
- From "Plugins" menu, add the GplusBadge plugin to your side bar, and from "Appearance"->"Widgets" menu, use the drop down configuration form of GplusBadge to add your Google+ id and save. You can find your Google+ id by going to your profile page in Google+ and the URL will have the 21 digit id.
If you like the plugin, please give it a rating and review on the WordPress Plugin directory
For any general website.
You can install Gplus Badge in three simple steps.
- First download an extract the contents of this zip file. Unzipping will give you a directory called "gplus-badge".
- Copy this directory to any location in your webserver .
- In your web page, add this code where you want the badge to appear.
<script type="text/javascript">
gplusbadge_basedir="GPLUSBADGE_LOCATION";
gplusbadge_userid="YOUR_GOOGLE+_ID";
</script>
<div style="text-align:left;font-family: tahoma;font-size:10px;" id="gplusbadge__0"><a href="/test/gplus-badge">Gplus Badge</a> by <a href="http://www.skipser.com">Skipser</a></div>
<script type="text/javascript" src="GPLUSBADGE_LOCATION/gplus-badge/gplusbadgeapi.js" ></script>
Important:
Replace GPLUSBADGE_LOCATION with the relative path of the location where "gplusbadge" folder is put. Eg, if you have put the folder "gplusbadge" in a folder "widgets" in your website's root directory, it should be "/widgets". There are two places in the code where you need to replace this value.
Replace YOUR_GOOGLE+ID with your Google+ id. You can find it by going to your Google+ profile or page in Google+ and the URL will have the 21 digit id.
Customisation.
You can customise almost all parts of the badge by using any or all of these additional lines -
gplusbadge_ispage="true/false";
gplusbadge_width="custom_badge_width";
gplusbadge_showplusone="true/false";
gplusbadge_plusurl="SITE_URL";
gplusbadge_plusonestyle="inline/bubble";
gplusbadge_showheader='true/false';
gplusbadge_showfollowers='true/false';
gplusbadge_follow_text="Follow me on Google+";
gplusbadge_bordercolor="CCCCCC";
gplusbadge_header_background="2D2D2D";
gplusbadge_header_textcolor="FFFFFF";
gplusbadge_background="FFFFFF";
gplusbadge_namecolor="3366CC";
gplusbadge_textcolor="333333";
gplusbadge_footer_background="EEEEEE";
gplusbadge_buttonstyle="normal";
gplusbadge_borderwidth=1;
gplusbadge_separator_color="DDD";
Just change the values to change your badge's appearance. For wordpress, the same options are available in gplus_badge.php file. For instance, to change the width of the badge, you should change the value of "gplusbadge_width". All values are self explanatory and here some things to know -
- Colour values SHOULD NOT be preceded by '#'
- There are three variants of "Add to Circles" button available - "normal", "red" and "blue".
- Width and height values should not have a trailing "px".
- +1 button will not show up if SITE_URL is not given. SITE_URL should be preceded by http://
The default theme will look good on most websites. But you can further improve it to look best with your website theme by changing the colours and borders.
Why should I choose this over others on the Internet.
If you google, you can find other customisable badges too. So what makes Gplus Badge special?
- First and most important thing is looks. Probability of a viewer clicking on the badge and adding you to their circles is more if it looks nice and integrates with your site's theme. Here's where the complete customisation helps.
- Few badges require you to activate the Google+ api key. Now Google+ imposes daily and per-person limits on the api usage. That means although you will see the badge fine after adding, once the limit is crossed, your visitors will be seeing a crumbled and ugly badge. Gplus Badge doesn't have this problem.
- Many badges call scripts from the authors server. That means, if that server is down, your visitors won't be happy. But with Gplus Badge, the scripts are from your own server which means if somebody can see your page, they will 100% see your Gplus Badge as well.
A common mistake most webmasters do is to leave a lot of real-estate on the side panes empty. Instead of blank space, adding a social badge will definitely help gaining more readers. So try it out and let me know after you have added it to your site. I will definitely give you some credit as a backlink on this page.
If you encounter any issues, please let me know as comments below.