IMP: If you are looking to use google drive as a secure option in your android phone, a better option would be "Sec Notes". It support text notes, spreadsheets as well as checklists with all possible formatting options. Password, pin and pattern locks are available for security in the app.
With Google Docs merged to Google Drive, a lot of us have cultivated the habit of storing any and every document into Google Drive. After all, its safe, secure and maintained by Google in the cloud.
And like a lot of people I also have a spreadsheet containing some little private info which I need to access now and then. Something like a bank account number, login ids, social security number etc which I can look-up using the Google Drive app on my phone.
There is a small problem here. Although Google Drive can only be accessed after logging into Google, we are almost always logged into Google in our phones and PCs. That means if somebody gets access to your PC or phone momentarily, he/she can actually take a peek at these... not too good!!!
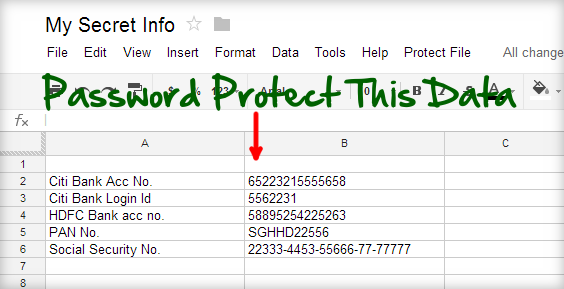
Password Protected Google Spreadsheet.
The best solution to this problem would be to have Google Drive ask for a password each time you open a document. Unfortunately, Google doesn't provide such a protection feature in-built. But you can achieve the same using the password protected Google Spreadsheet which uses Google Scripts. Here's how to use it.
- Open and make a copy of ProtectedSheet Google spreadsheet. You can rename it to any name you want.
- Next select "Tools->Script Editor". This will bring up a script in a new window or tab.
- In this window, select "File->Manage Versions" and click on "Save a new version". You can leave all fields blank. A new row for version 1 will appear. Just click "OK" button.
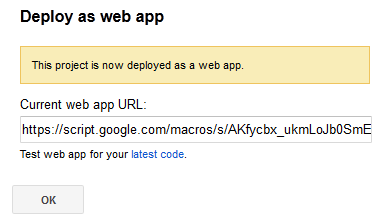
- Now select "Publish->Deploy as webapp" and click on the "Deploy" button.
- You will now be shown a confirmation that you app has been deployed as a web app.
- Now close this window and come back to the spreadsheet tab or window. You will find a new menu item "Protect File" in the spreadsheet. Select "Protect File->Initialize" and provide required permissions.
All the above steps are one time only. You have now fully setup your password protected document. - Now you can add what ever you want to store securely into the document. Just make sure you leave the first two colored rows intact.
- To secure the document, select "Protect File -> Encrypt File". You will be asked to enter a password. Once done, this will scramble the content each cell in the document. Now your data is fully password protected and nobody can read it without having the password you have set.
NOTE: This password is not your Google account password, but any password you can choose. The first time you run "encrypt", you will be asked to set a password which will be used for all further encrypt/decrypt requests. - When ever you want to decrypt your document, open it and select "Protect File -> Decrypt File". You will be again asked for the password giving which it will decrypt and bring back the cell contents which you can read or edit.
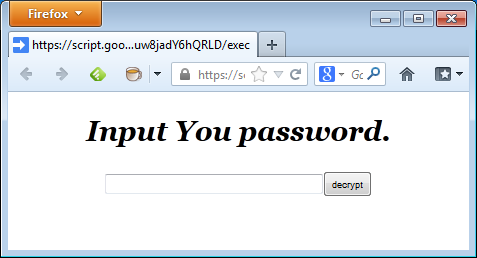
This works well if you are opening the spreadsheet in a PC. But if you are opening it from a phone, Google always loads the phone version and you won't get the "Protect File" menu. To encode/decode your spreadsheet from a phone, click on the encrypt/decrypt URL which will be present in the first row. This URL gets created and added once you deploy the web app in step 4 above.
On loading the URL will show a web page where you can enter your password to encrypt or decrypt the document. Once done, a "Go back" link will appear which you can click to load the encrypted/decrypted spreadsheet.
You can also change the password anytime using "Protect File -> Change Password" menu option. Please make sure you don't edit and change the encrypted document. If you do so, the decryption won't be able to give back the original content. And as always, the script is your local copy and runs entirely in your Google account. Nobody else has access to anything including the password you set.
How it works.
On clicking the encrypt menu, the script checks the password with what you have set. Only if it matches, the contents of the Spreadsheet is read and text in each cell is obfuscated. On clicking Decrypt, the same algorithm converts the obfuscated text back to the original text if the password matches.
Finally, here's a video to see Google document password protection in action.